Navigating the Item Settings
Now that the file is stored in our MAM, we can search for it by file name or ID.

By hovering with the mouse on any item in the MAM. We can see possible options,
 - Delete - Delete the media item from the MAM
 - Preview - Watch a preview of the item in a new window
 - Copy ID - easily copy the item Media ID
 - File Edit Section - finally, and very useful and important, to view and edit all information we have on every content item.

Hover over the desired file (in the MAM) with the mouse and click on the icon![]() to go to the file Edit Section.
to go to the file Edit Section.
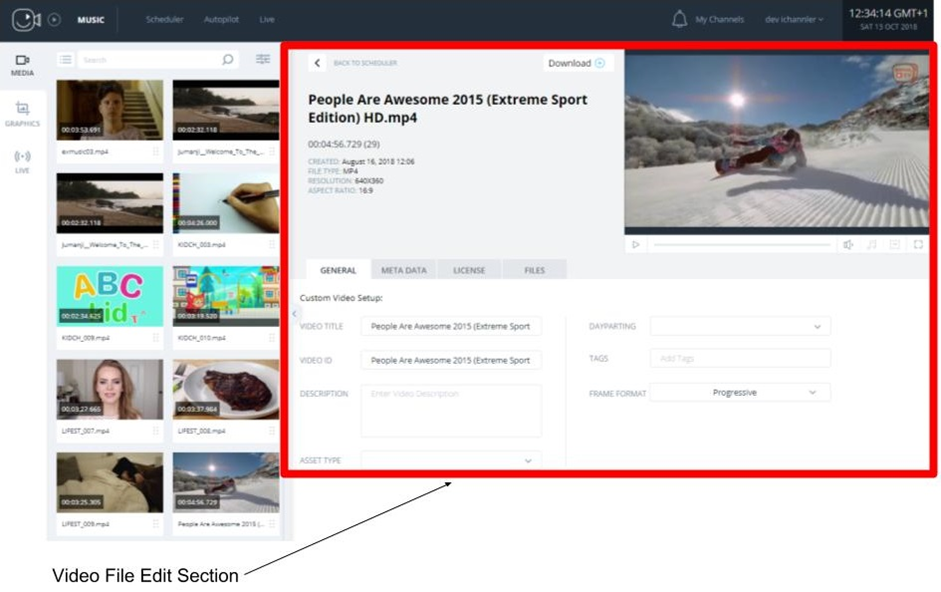
The upper part of the Edit Section shows information regarding the uploaded video file (date created, type of file, resolution and aspect ratio) as-well-as a small preview window and a download option. Click to select the type of file you wish to download.
- Original File - Download of the original file that was uploaded.
- Transcoded - Download of the transcoded file used for playback.
- Preview - Download of a small-sized preview-quality file for quick monitoring.
You can also use the player to watch a preview of the item.

In the Preview Window:
- Click the
 icon to start playback.
 - Click the
 icon to raise or lower the volume.
 - Click the
 icon to select the dubbing language
 - Click the
 icon to select the subtitles language.
 - Click the
 icon for full-screen viewing.
The bottom part of the Edit Section lets you edit the criteria for a file. This section is divided into 5 horizontal tabs: General, Metadata, Segments, Files & Position.

General Information Tab
The General Tab lets you edit general information regarding the video file, using the following criteria:
- Video Title - Change the name to your liking.
- Video ID - Every file that is uploaded gets a Video ID identical to its name. Feel free to change the ID to your liking.
- Description - Give a short description for your video file.
- Asset Type - select between Ad, Video, Promo, Intro or Filter.
- Dayparting - Choose whether the file is due to Morning, Evening or Late Night broa
- Tags - Add Tags to your file.
- Frame Format - Select the frame format of your file (Unknown, Progressive, Top Field First or Bottom Field First). If you are not sure which option suits your file the best, select Unknown.
- Start Timecode - set a specific start timecode for the item
- Crop Settings - use this tool to crop the item, the crop preview will appear on the preview window
The video title and the video ID are generated automatically from the name of the uploaded video file.
They can be edited later on if you wish to edit the ID, the system will indicate whether the idea is taken.
It is also possible to edit the description and tags, tagging will help search for a specific tag in the MAM and later in the graphic system.

Metadata Tab
Metadata is unique for every client.
You can choose which metadata fields to have in your account, which will be shared with whole channels in your account.
Metadata fields can be changed manually one by one or automatically in bulk with a metadata excel file.
The metadata file can either generate a file to the platform (EPG) or be used in the dynamic graphics system for information on the graphic itself
You can also edit and update the Metadata for some or all of your items by using the Upload Media Metadata feature.

Segments
The Segment tab allow you to easily segment your long-form content, and break it up to multiple segments, this also can be used for a single ad item containing multiple ads, and choosing a specific ad to play.
to begin segmenting your content click on the ![]() icon, this will create a new segment.
icon, this will create a new segment.
when segmenting you items you can chose to use either FPS or Milliseconds.
once a new segment is created you can use the preview window to scrub the video to the desired segment location, and then click one the following icons:
 - Set TC IN from preview - this will set the TC (timecode) in of the segment to current location set on the preview window
 - Set TC Out from preview - this will set the TC (timecode) out of the segment to current location set on the preview window
To Delete a segment, select any one of the segments using the checkbox on the left of each segment![]() , and then click the
, and then click the ![]() icon.
icon.

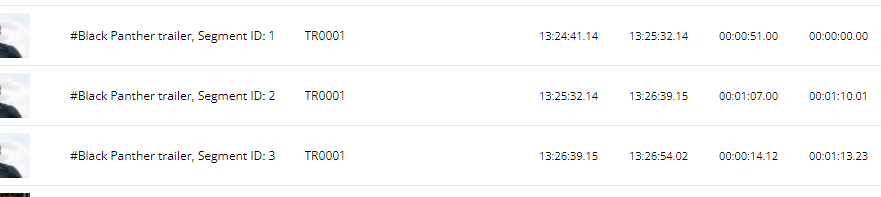
Once you finish segmenting your item, you can select which segment to schedule when dragging and dropping an item to the scheduler

Here you can select to either schedule each segment separately, or schedule the entire media
Once scheduled, you can see the individual "Segment ID" of each segment on the scheduler.
Files Tab
You can add additional subtitles and audio tracks in the files tab. It's possible to add up to 16 different subtitles and 16 audio files.
The packshot is the picture and the player before playing the video. The promo is a short video that can run just before the item. The packshot and promo are generated automatically by the system and are editable. The Promo and Packshot can also use them in the graphic system.

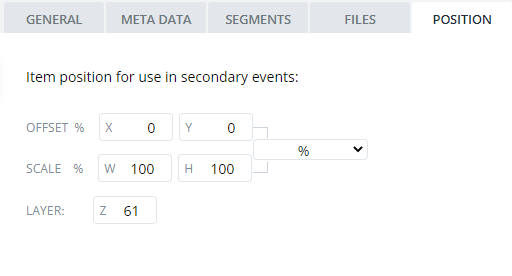
Position
The position tab is used to set the position of any media item when used as a "Floating Media"
for example, if you chose to upload a .PNG logo to the MAM, you can use the this option to position the logo anywhere on the screen, and then schedule the logo as a secondary event.
the Logo will then appear on the screen in the position set in this TAB