The schedule can also be updated via a CSV file
follow this template using the Media ID of the items, make sure that the date is set to a future date, and set the first items' starting time. All the rest of the items will follow the order provided in the file.
Before diving into the details, there are a few things to note:
- You must upload files to the MAM before uploading CSV files.
- The system links the items listed in the CSV file according to their Video ID.
- If you are uncertain about the ID of a certain item, go to the Video File Edit Section of the specific Video File and check the Video ID in the General
Here’s a detailed list of all columns in the CSV file in chronological order:
- DATE - Fill in the Date you wish the item to start, using this format: DD/MM/YYYY (i.e., 15/01/2018)
- Start Time - Fill in the time you wish the item to start playing, using the following format: HH:MM:SS: FF (i.e., 15:30:00:15 - the item will start playback at half-past 3 pm and fifteen frames).
- Media ID - Fill in the correct Video ID of the item you wish to broadcast. (please note: The Media ID is not case-sensitive. Regardless of that, we recommend keeping capital letters and lower-case letters the same as the files in the MAM).
- Start Type - If you set a Date and Start Time for your item, leave the Start Type cell blank. (see next section for more details).
- Type - Fill in the correct type of item. For video files, you should type MEDIA (case sensitive).
To upload your first CSV file, follow these steps:
- Fill in the Date and Start Time columns for one item scheduled to start playback tomorrow at 09:00 PM.[1]
- Fill in the correct Video ID in the Media ID
- Since you already set a date and time for the item to start playback - leave the Start Type column empty.
- Fill in MEDIA (capital letters) in the Type
- Save your CSV file.[2]
- At this point, your CSV file should look something like this

[1] If there is already an item in the Scheduler at 09:00 PM tomorrow, uploading the CSV file will overwrite the previously scheduled file.
[2] Although not mandatory, we recommend naming CSV files according to their respective channel name and date of the upload (i.e., Sports Channel 15.01.18).

You can use this method for each item in the CSV file (setting the Start Time & Date for each item to start playing).
If you have multiple items that should be broadcasted consecutively one after the other, using this method will mean you will have to check the exact ending time of the previous item and dial that in as the Start Time of the next item, which, if you have a large number of files to schedule, can be very frustrating. Instead, follow these steps to learn how to quickly add files to be played consecutively one after the other:
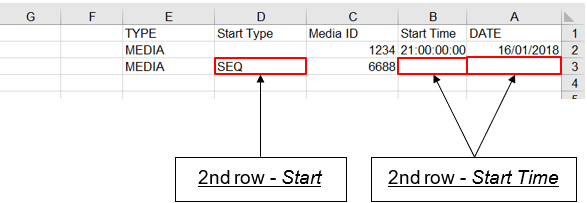
- In the first row, specify the Date, Start Time, Media ID, and Type of item.
- In the second row, add a different item by typing its ID in the Media ID cell and leave the Date and Start Time cells empty.
- Fill in MEDIA in the Type
- In the Start Type cell, type SEQ (case sensitive - make sure to use only capital letters). This will ‘tell’ the system to play the item in sequential order right after the first item.
- Add as many items as you wish using this method.
If, for any reason, you wish to leave a ‘gap’ in the Scheduler, not having all items running in sequence, simply define the Date and Starting Time of the first item you want to be played after the gap. Do not forget to leave the Start Type empty.
(if you type SEQ in the Start Type cell the system will disregard the Date and Start Time and will play the item right after the previous one. In other words - Start Type has priority over the Start Time and Date fields)
-
- Log-in to your account
- Click the User Menu > Import > Upload CSV.
(This will open the Load CSV Script Page in a new tab) - In the Load CSV Script Page, select the desired channel from the list and click on Choose File.

Select the channel where to schedule CSV and choose the file you edited before.

There are three options to choose from.
- Ignore Missing Show and Close Gap - If the CSV contains a media ID that does not exist in the MAM, ignore and close the gap.
- Create a New Contract for Missing Show - Create a contract (place holder) to add an item later.
- Report Missing Show and Abort CSV Upload - Receive a full report of missing id's and abort the upload
After choosing, press "Submit," and you will see the CSV log at the bottom to check if there are gaps or errors.

Once you're back in the system, you will see the items loaded to the scheduler at the requested date and time.
CSV Script Errors
Every script error has a reason and a solution. Here is a detailed list of all errors which may occur when uploading CSV files.
|
Error Name |
Error Type |
Reason |
Solution |
|
Row # : TYPE is not supported |
Warning |
False value in a field / Missing Column |
Write the correct TYPE |
|
Row # : 1st data Cannot be using time SEQ. |
Warning |
1st cell in Start Type cannot be SEQ |
1st Start Type cell should be empty |
|
Could not find media. MEDIA_ID = |
Warning |
Missing / blank information in a Media ID cell |
Fill the correct Media ID for the item |
|
Could not find media. MEDIA_ID = [File ID] |
Warning |
Mismatch between the ID in the CSV and the items in the MAM |
Match ID's |
|
Total broadcasts failed = [Nr.] |
Warning |
General indication of how many items fail to load |
--- |
|
CSV parse FAIL. Please fix errors in the CSV and try again. |
Unable to load CSV - General Error |
Could be any small error that led to the CSV not loading |
Fix all fields |